Friday, 25 March 2011

The Making Of Project Dragon - Episode 8

Get Set...


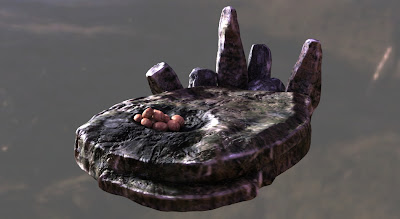
It was decided that some set augmentation was going to be required for this shot. There were no rock formations large enough for a dragon, and it was decided it would be best to simply add a C.G. rock nest. This was a relatively simple modelling job. Basic geometry was created in Maya, then transferred to ZBrush for a high detail sculpt and texturing. The textures were created from reference images taken on the day of the shoot.
The models were than transferred back to Maya with textures and normal maps. The normal maps enable models to appear to have high levels of detail, without having a large effect on render times.

(Click to embiggen image)

Above you can see a test render of the nest with some dragon eggs. You can see I added a black colour around the eggs where the dragon breath has left some carbon deposits with its fire breath.

The standing stones around the main body of the nest are there to mask out the top of the hump that the nest in the background plate. This reduces the need for additional set replacement or compositing at later stages.

Tuesday, 15 March 2011

The Making Of Project Dragon - Episode 7

Just A Little Background


Now this project is planned to be C.G. elements composited onto live action plates. This means that we need to have background plates that we can use during production.

For this project, the background plates were shot on Marsten Moor, a location selected for is distinct visual look. However, the landscape of the location is mostly hilly grassland, largely lacking in distinct features. This could have posed a problem with match moving; the process where the virtual C.G. camera has its movements matched to the practical camera used on set.

This problem had been foreseen, however. To remedy the problem, a series of tracking plates were created. These are white wooden boards with distinct black markers which were placed around the scene. This added a great deal in information for the match move, and helped eliminate any issues that might have occurred.

(Click to embiggen image)

With these tracking markers, the background plates could now be tracked with relative ease, but the addition of them to the shot has created a different problem; the markers are now in the shot and don't look very good.

The solution, therefore, is to digitally remove them. This wasn't as easy as it is for some shots, as the camera has a lot of movement in, but I did now have a solid match move of the scene. With this data, I was able to bring a 3D camera and tracking data into after effects. This allowed me to create 3D clones of the shot which could be masked and placed over the markers in the background plate, thus removing the markers.

With this done, the background plate is now ready for production.

Thursday, 10 March 2011

The Making Of Project Dragon - Episode 6

Using A Little Muscle

Today I want to show you something that I hadn't planned to add into the project originally, but as I am ahead of schedule, I decided that it was worth the extra effort. What I am doing as adding a muscle system to help rig and animate the dragon.
As you can see in the video below, I have slightly developed the bones I showed in an earlier blog, and have attatched a set of muscles to them. The add a surface for the mesh to slide over, and also add jiggle to specific areas of the model.


Testing of this particular set of muscles shows that I may have gone a bit overboard with the level of detail on the muscles. While they are anatomically realistic, the information doesn't transfer onto the model as there are not enough vertices to take the data. This, paired with the amount of time it takes to set up each muscle with onto the rig and working with the model, means that I will most likely re-rig the muscles, using larger and more simplified muscle groups.

Until later,
Alex

Tuesday, 8 March 2011

The Making Of Project Dragon - Episode 5

Issues Of Light

One of the key elements that helps blend a CG element into a live action plate is the lighting, and how that lighting interacts with the surface of the model in question. To get an idea of how comlex this can become, take a look at your hand, and see how the light interacts with it. See how there are subtle shadows around creases, tendons and between the fingers. Look at how the light from the computer monitor is reflected off the skin. Think about what would happen if you shine a bright torch against your finger, and how a red glow would shine through.

All these elements need to be replecated in order to produce a realistically lit subject in CG. One solution to these problems is something called image based lighting. Basically, when on location, I took a series of photos of a shiny silver ball from three different angles, then through a series of computer processes, these are unwrapped and stuck together to produce a single image which shows the whole environment.

(Click to see full size image)

(If you look, you can see three images of me taking the photos in the above image.)
Now, this image is then taken into maya and used as an image based light, which is a sphere with this texture on the inside. The image used differs to the above version in that it contains a lot mor information about the brightness in the environment, and it is used to project light of the correct colour and intensity inwards, providing very subtle and realistic lighting. It also gets used to add reflection to the seen, so when used on the dragon, it will reflect the location on the skin and in the eyes.

On the subject of skin, I have kept working on the surface of the skin. I have added an effect called sub-surface scattering, which replecates how light interacts with translucent objects such as skin.

(Click to see full size image)


Now this dragon will probably look quite similar to that in previous posts, with the exception to some changes in the shinyness of the skin. The real difference can been seen when the model is lit with a strong back light.

(Click to seefull size image)


Now you can see the light shining through the thin membrane of the skin, revealing the network of blood vessels within.

This close interaction between the light and the surface is maybe on of the biggest elements that need to be right in order to sell an effect shot like the ones I have planned, so I am hoping that this blends in well when we get further towards our end product.

As a final treat, here is a close up shot of the dragon as it stands at the moment.

(Click to see full size image)

Until next time,
Alex

Monday, 7 March 2011

The Making Of Project Dragon - Episode 4

Bones Of The Beast

Today I will go into the process of adding joints and bones to the dragon model to make it possible to animate at a later date.

The first step is to add joints. These are chains of virtual pivut points that the model translates around. These joints need to be laid out to replecate the anatomy of the model, in this case the dragon.


The image above shows the joint layout in the default pose. In this instance the joints have been coloured, which is a result of the skinning process within Maya. Maya supports two main forms of skinning: smooth skinning and rigid skinning. Rigid skinning means that each individual vertex can only be moved by one bone. It takes little computational power to calculate, and is the technique used for many game engines.
In smooth skinning, each vertex can recieve influence from many bones, resulting in a more natural deformation of the mesh at the cost of a heavier calculation.

The rigging process does not end here, however. I am setting up this character with a system called Maya Muscle. In this system, you create bones that have a physical surface, and then add muscles to these structures. This results in the effect of skin sliding over bones and muscle, and can also add the subtle effect of the mass jiggling when it moves.


Here you can see the rig with most of the bones added in. Some of the more important bones are the shoulder blades, the hips and the ribs, as these can often be seen moving under the skin in real life animals. There doesn't need to be a high level of detail in these bones, as they will never be seen. They merely need to have volume and a suface to drive the skin mesh. The next stage is to add the muscles, and that will be revealed in next weeks post.

Until then,
Alex